Building a CI / CD Pipeline in Space
In the previous post we learned how to push artifacts to a package repository. Let’s assume that we’ve implemented the first use cases for our backend application with some unit tests. Now imagine that two engineers join the project and you know you’ll practice continuous integration in order to establish a best-practice of high performing teams from the beginning of your greenfield project.
In order to get a CI/CD pipeline, if you’re not so lucky you need to create a ticket describing everything upfront, join a few meetings and wait some time until somebody with the right permissions starts working on it. If you’re lucky, your team hosts the source code and the package(s) of your application on JetBrains Space and you can just start working on it right away.
Open Space, navigate to your project and click on “Jobs” in the menu on the left. With the “Create .Space.kts” Button you can get started easily. Space automation is based on jobs implemented in Kotlin. If you’re not into Kotlin yet, no worries, Space generates a “hello world” job for you and offers many examples that you can just apply and tweak for your own needs.
Maven is not (yet) a first class citizen of Space automation like Gradle, but the documentation gives examples that can be used right away. For our application, the first version of our automation script looks like this:
job("Build and run tests") {
   container("maven:3.6.3-openjdk-15-slim") {
       shellScript {
           content = """
	            mvn clean install
           """
       }
   }
}
This is quite self explanatory and means
- The job with the name “Build and run tests”
- should create a container from the image “maven:3.6.3-openjdk-15-slim”
- and run “mvn clean install”
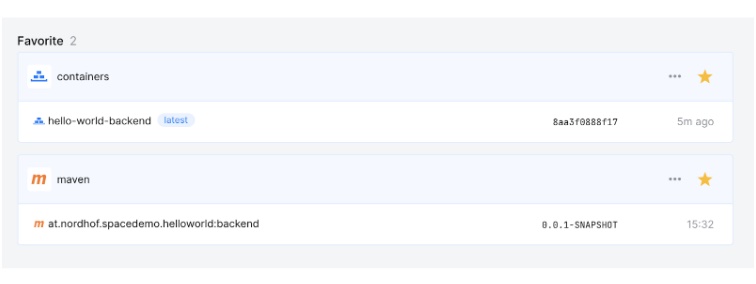
As soon as this is committed to the main-Branch, the job launches and two minutes later, we’ve got our first successfull build:
![]()
By the way, if you prefer to use the Maven Wrapper, just use a pure jdk Docker image and call the `./mvnw clean install` command in the shellScript part.
job("Build and run tests") {
   container("openjdk:15-alpine") {
       shellScript {
           content = """
              ./mvnw clean install
           """
       }
   }
}
Jobs and Steps
An automation script consists of jobs and a job consists of steps. So the simplest automation script has one job with one step. This is what we basically have here. Generally a script can have multiple jobs (up to 100) whereas all jobs in one script run in parallel. One job can contain up to 50 steps, whereas steps can be configured to run in parallel or in sequence. Currently there are some restrictions regarding the environment to execute steps in. The documentation under https://www.jetbrains.com/help/space/jobs-and-actions.html#main-features-of-jobs-and-steps gives more details.
Publishing the generated artifact
Usually a build pipeline delivers an artifact that you can publish somewhere for further processing or for your peers if you work on a library. Since we’ve already configured our maven package repository, we must change or script to push the resulting .jar file.
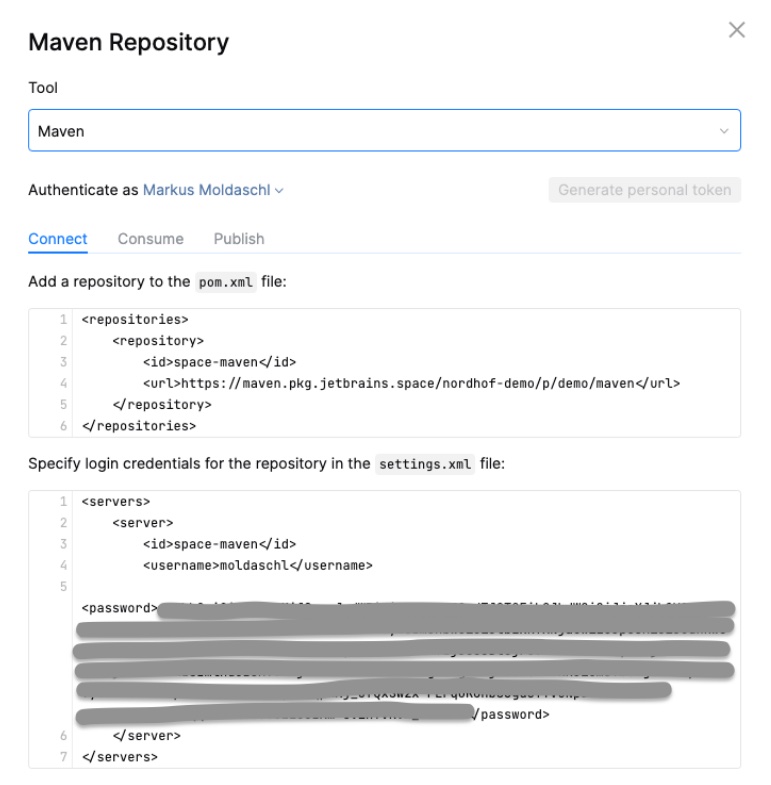
As we’ve seen in how to connect to a package repository, you need a settings.xml file. Usually you have one persisted on your local machine which is used by Maven to retrieve credentials for the repository to publish to. Since the containers where the build jobs run are ephemeral, the only place to store settings is in the repository itself. So you need to create a settings.xml where you configure the username and password with placeholders which will be replaced during runtime.
<settings>
   <servers>
       <server>
           <id>nordhof-demo-space-maven</id>
           <!-- provide credentials via the command-line args: -->
           <!-- 'spaceUsername' and 'spacePassword' -->
           <username>${spaceUsername}</username>
           <password>${spacePassword}</password>
       </server>
   </servers>
</settings>
Next we need to adapt the build script in order to publish the artifact.
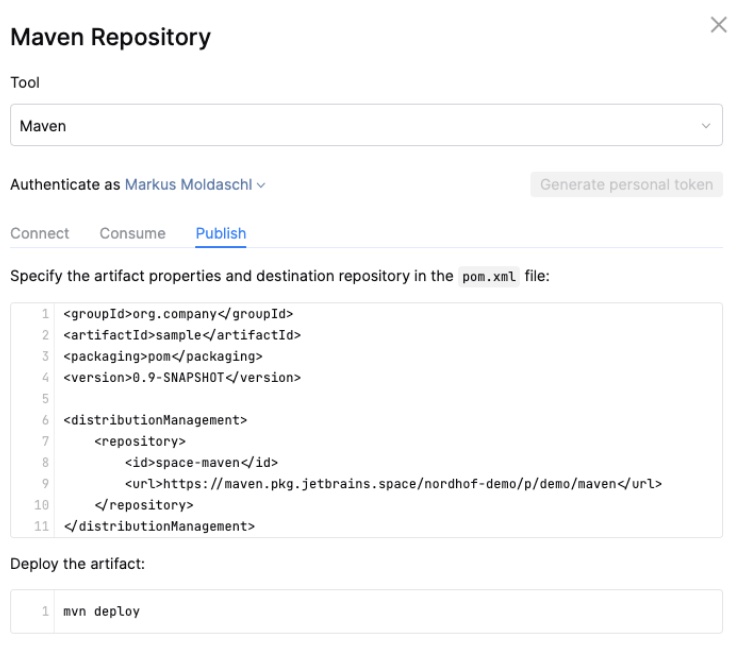
job("Build, run tests, publish") {
   container("openjdk:15-alpine") {
       shellScript {
           content = """
              echo Build and run tests...
               ./mvnw clean install
               echo Publish artifacts...
               ./mvnw versions:set -DnewVersion=${'$'}JB_SPACE_EXECUTION_NUMBER
               ./mvnw deploy -s settings.xml \
                   -DspaceUsername=${'$'}JB_SPACE_CLIENT_ID \
                   -DspacePassword=${'$'}JB_SPACE_CLIENT_SECRET
           """
       }
   }
}
We should have a closer look at two commands:
./mvnw versions:set -DnewVersion=${'$'}JB_SPACE_EXECUTION_NUMBERsets the version of the jar-file and as you can imagine the placeholder ${‘$’} is replaced with the value of the subsequent environment variable JB_SPACE_EXECUTIION_NUMBER which is provided by Space.
./mvnw deploy -s settings.xml \
                   -DspaceUsername=${'$'}JB_SPACE_CLIENT_ID \
                   -DspacePassword=${'$'}JB_SPACE_CLIENT_SECRET
is used to publish the artifact to the maven repository. With the `-s` option we can tell Maven to use the settings.xml file we have in our repository and with `-DspaceUsername=${‘$’}JB_SPACE_CLIENT_ID` we can replace the placeholder `spaceUsername` from the settings.xml file with the value of the JB_SPACE_CLIENT_ID environment variable. In JB_SPACE_CLIENT_ID and JB_SPACE_CLIENT_SECRET credentials are stored to authenticate in various Space modules like package repositories.
There are many environment variables which might be helpful in the build pipeline, e.g. JB_SPACE_GIT_REVISION. Have a look at the documentation (https://www.jetbrains.com/help/space/automation-environment-variables.html) to find out more.
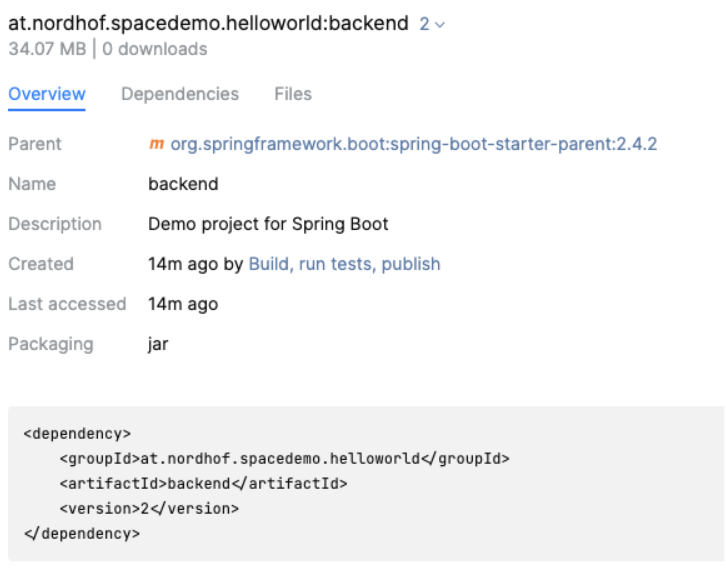
After those changes are pushed, the job starts automatically and if we did everything right, there is a new .jar file in our maven package repository:
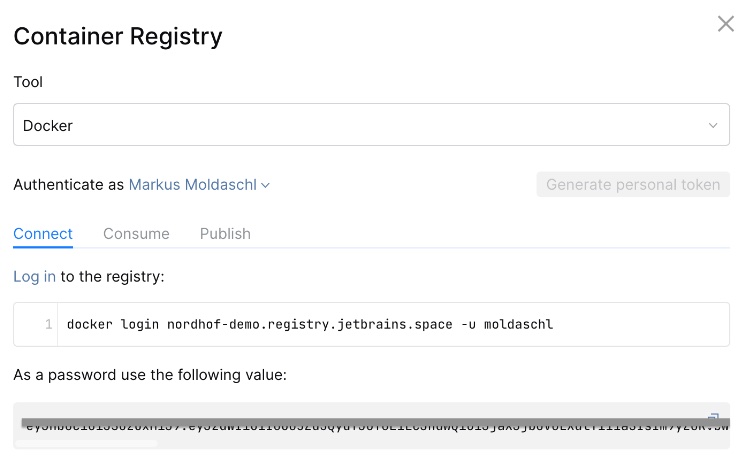
Building and publishing a docker image
Since we’re planning to deploy docker containers, we also want a docker image as a result of our build process. Therefor we need to add a new step to our build job:
docker {
   beforeBuildScript {
       content = """
           echo Copy files from previous step
           cp -r /mnt/space/share docker
       """
   }
   build {
       context = "docker"
       labels["vendor"] = "nordhof-demo"
   }
   push("nordhof-demo.registry.jetbrains.space/p/demo/containers/hello-world-backend") {
       tag = "0.0.\$JB_SPACE_EXECUTION_NUMBER"
   }
}
docker is a special step, actually a special container having Docker installed. It is used to build and publish docker images. Let’s look at the details:
- In the “beforeBuildScript” section, we copy files that the previous step shares via a file share (https://www.jetbrains.com/help/space/sharing-execution-context.html#accessing-file-share-directly)
- In the build section the docker build is executed with the path to the docker context.
- In the push section the docker push command is executed. With the tag configuration, it’s possible to set a certain tag. In our example here, we use the JB_SPACE_EXECUTION_NUMBER to set a specific version.
Further documentation about build docker images in Space automation can be found under https://www.jetbrains.com/help/space/docker.html.
The entire automation script now looks like this
job("Build, tests, publish jar, publish docker") {
   container("openjdk:15-alpine") {
       shellScript {
           content = """
              echo Build and run tests...
               ./mvnw clean test
               echo Publish artifacts...
               ./mvnw versions:set -DnewVersion=${'$'}JB_SPACE_EXECUTION_NUMBER
               ./mvnw deploy -s settings.xml \
                   -DspaceUsername=${'$'}JB_SPACE_CLIENT_ID \
                   -DspacePassword=${'$'}JB_SPACE_CLIENT_SECRET
               cp -rv target /mnt/space/share
               cp -v Dockerfile /mnt/space/share
           """
       }
   }
   docker {
       beforeBuildScript {
           content = """
               echo Copy files from previous step
               cp -r /mnt/space/share docker
           """
       }
       build {
           context = "docker"
           labels["vendor"] = "nordhof-demo"
       }
       push("nordhof-demo.registry.jetbrains.space/p/demo/containers/hello-world-backend") {
           tag = "0.0.\$JB_SPACE_EXECUTION_NUMBER"
       }
   }
}
Note the changes in the maven step compared to the initial version in the post. We changed the build command from “./mvn clean install” to “./mvn clean test” because “test” doesn’t create a .jar file. With “install” we would finally have two .jar files in the target directory, one with the version configured in the pom.xml and one with the version we set in the “./mvn versions:set” command build by “./mvn deploy”. Also it is necessary to use the “cp” commands to share the target directory and the Dockerfile with the next step.
As soon, as this script is pushed it successfully
- builds the jar file
- pushes it to our maven package repository
- builds the docker image
- pushes the docker image to our docker repository
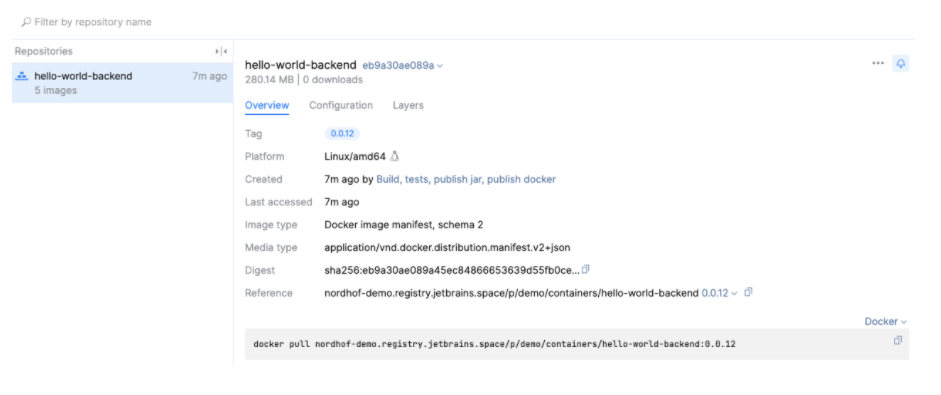
And finally there is our newly created docker image in the docker repository of our project in Space.
Conclusion
With just a few lines of code developers are able to craft their build pipeline for their repositories. This enables autonomous work of teams and with the utilization of docker they have many possibilities to do whatever their application needs.
There’s a lot more to explore about Space Automation in general, e.g. there is an interesting blog post by Maarten Balliauw on how to optimize routine workflows using Space Automation (https://blog.jetbrains.com/space/2021/01/18/using-space-automation-to-optimize-routine-workflows/)